Wednesday, December 21, 2011

Big Sis Art Gallery

Some new additions for the big sis virtual art gallery..
In this picture, she chose to draw Mary riding a donkey with Joseph walking beside her. This was totally unprompted, so Mommy was thrilled to see that she has been listening to the Christmas story this month!

This is a self portrait. She is wearing her penguin shirt and holding an "I love you" sign. (For a preschool Mother's Day present, they took pictures of the kids holding an "I love you" sign - hence the inspiration.)

Elf on the Shelf Present

Evidently, Pop Bubble learned that other elves (Peter and Elfie) were being allowed by Santa to share some magic elf seeds. One morning we found him hiding in a tea pot with the letter below from Santa (if you read closely, evidently Santa had a late night...I think he meant to say "should" instead of "took").


The girls planting their elf seeds...

After following the directions, here's what we found the next morning!

Small bell wreath

Saw one of these hanging at Michael's and the supplies were on sale, so decided to give it a try!

Supplies needed:
Bells
Wire (I used floral wire an it was way too weak - I plan to get something thicker or see if I can cut down a wire hanger)
ribbon or other adornments

I already had a silver version of this that I received as a gift. We usually hung it from a door knob so the door jingled every time the door opened, until one day the dog destroyed it. Very easy to make! Kids could make it for a teacher or grandparent or something (with a little help).

Just string the bells onto the wire, twist the wire together to close/shape into a circle, then add ribbon/raffia/twine/whatever to adorn it and make a hanger if desired.
I'll try to fix mine and get a finished picture. I loved the fun colors (even though they don't match any of my Christmas decor) and used a sparkly purple ribbon to make a bow and a circle hanger.

Glitter votives

These weren't anything spectacular, but can look quite pretty and would be fun in bright colors in the right room. I had purchased tea lights through a dance fundraiser for big E's preschool teachers and wanted her to help with part of the gift, so we came up with this project!

Supplies needed:
glass votive cups
Mod Podge
sponge brush
fine glitter
possibly a spray sealant

Apply Mod Podge to the outside of a votive cup. Sprinkle with glitter and let dry. I opted to add a spray sealant to keep the glitter from coming off every time I touched it, although it does slightly alter the sparkly effect (still sparkly, just one shade duller?). We made some of these in my MOPS group a few years back, only we also rolled the cups in small sparkly beads. It looked pretty, but the beads did come off fairly easily.


Sunday, December 18, 2011

Update to purse notebooks

I decided to make purse notebooks as a little something extra for my nieces' Christmas presents. I made them similarly to my original blog post, but found a helpful change. This time, instead of making the "buckle" out of cardstock, I used a wide, grosgrain ribbon that I had on hand. This works really well in terms of keeping the notebook thin and it also won't tear. we had issues with the cardstock tearing when my little ones would open and close their notebooks. I still don't know how well it will keep over time. I hot glued it and just don't know how well that will keep. Regardless, I like the way they turned out and thought I would share the alteration.


Easy Christmas Card Display

This idea came from Caroline over at Oh Pickles and it's one of those simple ones that makes you want to hit yourself upside the head and go, "Why didn't I think of that!?"

Supplies needed:
nail
sturdy/wide ribbon
clothespins (I used mini ones)
possibly scrapbook paper and Mod Podge
If you make your own bow - pipe cleaners or whatever you use to make it

Basically, just tap a nail on the inside of your coat closet (or other closet). Tie your ribbon to the nail then string it up over the door so it hangs on the outside. If you wish to make a bow to add, go for it. Clip your cards to the ribbon as they arrive! You can also mod podge (or decoupage as you fancier crafters prefer to call it!) some scrapbook paper on the paper clips to make them look a bit fancier.

I love that you can use this idea year round just by changing up your ribbon. It seems like we have a card-giving holiday each season...so fun! You could also just clip paper crafts or artwork that your kids do for that particular season instead. What a fun way to dress up a door!

(Side note: My pictures were taken at the beginning of the Christmas season, so I had to hang some of our Christmas cards up for effect...it looks even better now that it is more covered!)

Christmas Crackers

In college and for a few years after, I worked in a tea/gift shop and most Christmases, they sold packages of Christmas Crackers. I always thought they looked so pretty and would be fun to set at Christmas dinner table, but was never quite willing to fork over the money for them.

Turns out, they are pretty easy and can be inexpensive to make! (Some versions actually pop when you open them...my version does not.) I made them to take to my extended family Christmas celebration, as well as gave some to thank my daughters' Sunday school and nursery teachers.

Supplies needed to make them like mine:
**empty toilet paper rolls or other tubing
**glue and/or tape
**wrapping paper (I bought some at the Dollar store, but if you plan ahead and don't mind storing it...you can reuse any of the big scraps torn off packages when you open presents)
**curling ribbon
**scissors
**fillers of your choice (I mostly used candy plus a lip balm for some, but could use little toys, matchbox car, a bunch of crayons, etc.)

First, I cut out wrapping paper wide enough to wrap around the tube and 2-3 inches longer than each toilet paper roll. I glued the roll to the wrapping paper so that when my recipients opened their crackers, they hopefully won't realize I used a toilet paper roll..ha!
Next, I used a piece of ribbon to tie one end of the wrapping paper and added my fillers.
Finally, I tied off the other end and curled the ribbons.


They make cute stocking stuffers too!


Elf on the Shelf

While I really try to down play Santa's Naughty List and focus more on connecting Santa to the real meaning of Christmas, I do love Elf on the Shelf. Growing up, my grandmother had this funny looking elf that hid in her rhododendron year round, so I can't help but think of her. Plus, it's just a lot of fun!

Our girls named their elf Pop Bubble this year. (If you only could have heard their wild other choices...) He started out the year fairly tame, but recently has been more adventurous. Perhaps he is starting to miss the North Pole. Maybe he is just getting more excited for Christmas! Thought I'd share two of his recent antics...

I didn't get a picture of it, but this morning we found him making a snow angel in a pile of sugar on one of our cookie sheets.

Earlier this week, he was discovered putting together a mini disney princess puzzle (he kept adding pieces throughout the day).

My favorite of the week was turning the milk green/hiding in the fridge. (Hiding in the fridge actually concerned big E a bit - if I recall correctly, I think she was worried he had died! I reassured her that perhaps he is just a little homesick for the North Pole, where it is really cold all the time!)

I just love his ornery little eyes looking up at the milk!

I wonder what kind of mischief or fun he'll be up to tomorrow!

Tuesday, December 6, 2011

crafting ideas

So I told myself I WAS NOT going to check out pinterest, but then in a moment of weakness I hopped over. Wow. I could easily waste way too much time over there! Crafts and fun ideas galore at the click of a mouse! I have been wait listed for now, but that didn't stop me from setting a timer to look for fun ideas. Below are a few on my list!

Mind Jar: I actually saw this a while back and saved it in an email to make later. I think it is now time. Little E can throw some good fits and often has a hard time self soothing...thinking this jar might do the trick.

Christmas quote: Saw this quote...so cute! "Each of us is an Innkeeper who decides if there is room for Jesus. -Neal A. Maxwell" -Would make such a neat sign. (The link was to an etsy store that sells it in vinyl lettering - the shop is VinylLettering.)

I grew up having an old gumball machine in our house and have always loved the look of them. This is such a cute DIY version - so easy too!

Coasters: I've seen lots of coasters made from tile ideas, but I never would have thought to mod podge on a napkin! So fun!

Okay - going to call it quits now - time to do my Advent devotional!!

Monday, December 5, 2011

Tote Bags

Got this really cute idea from Oh, Pickles. (Please note: That is not a link to her instructions...just her adorable blog - lots of great hosting ideas...she is so great at the details!) I made these for my nieces for Christmas, which I plan to pair with a purse notebook and another little something. Both love to play school, so I figure at the very least these could become their teacher bags/notebooks!

Supplies needed:
Tote bag (I got mine at Hobby Lobby)
Paint (I used fabric paint)
Paint brush (I used a small paint brush - sponge brush might work and turn out cute too)
Paper doily (I used Wilton 12-inch diameter)
Might also use: spray adhesive, stencils (I made my own), ribbon


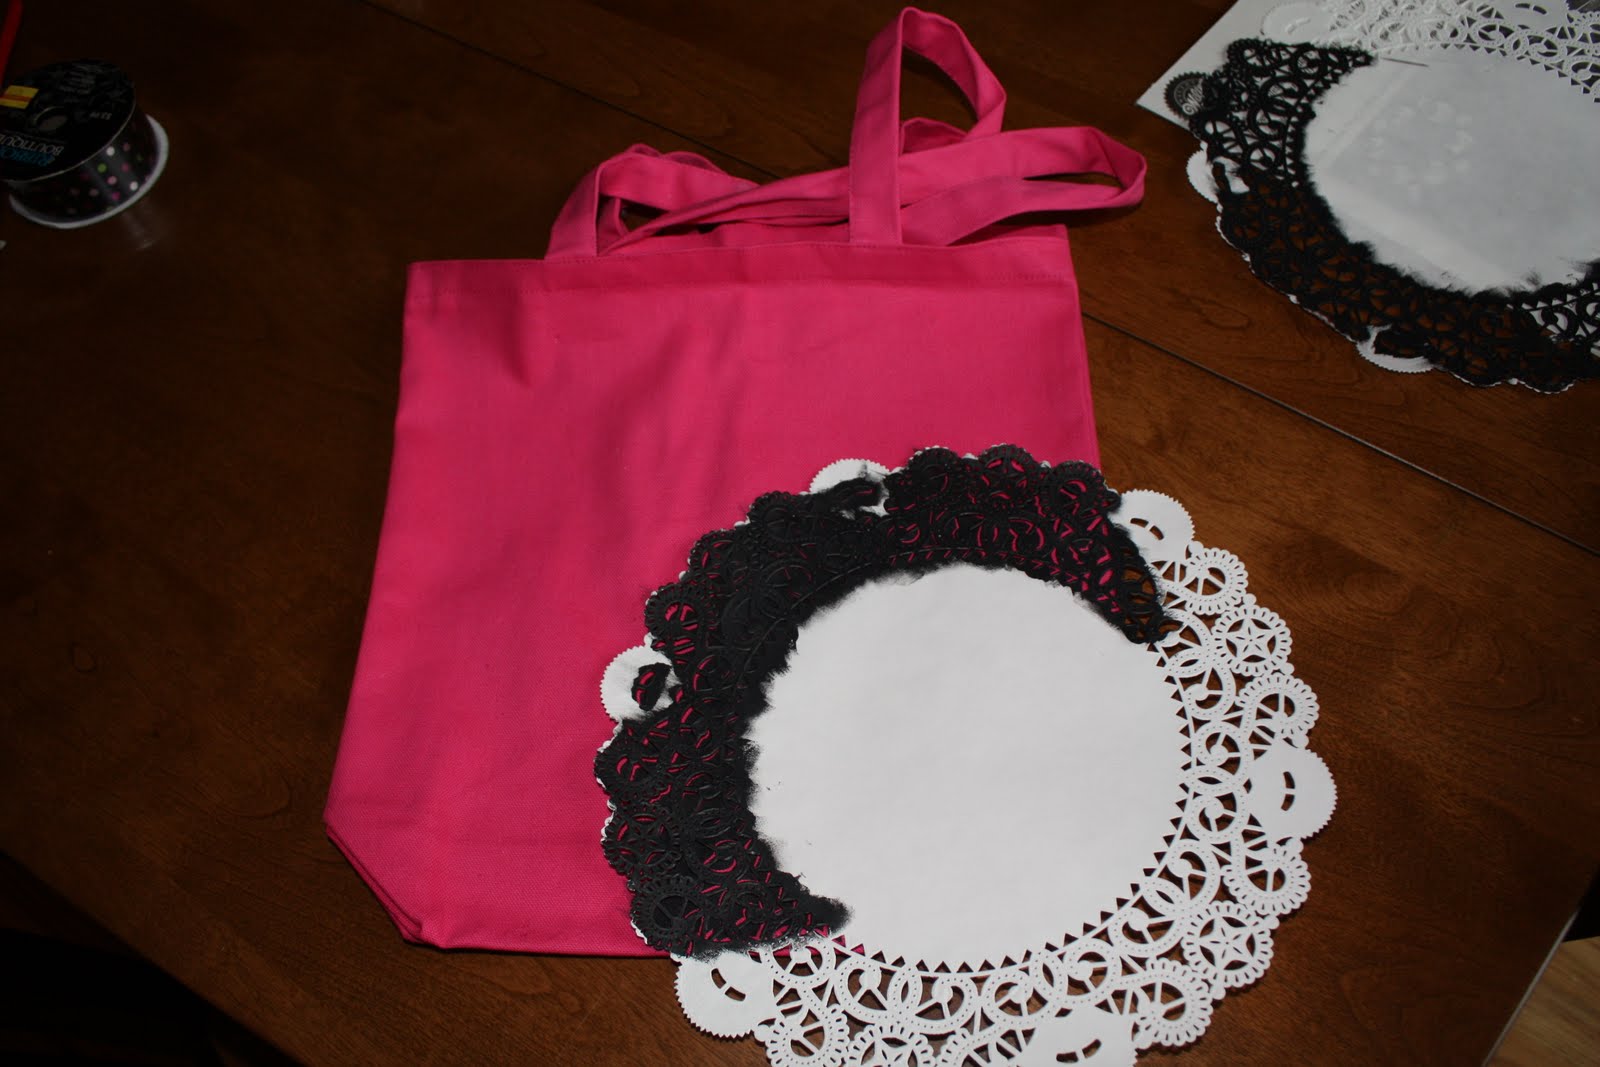
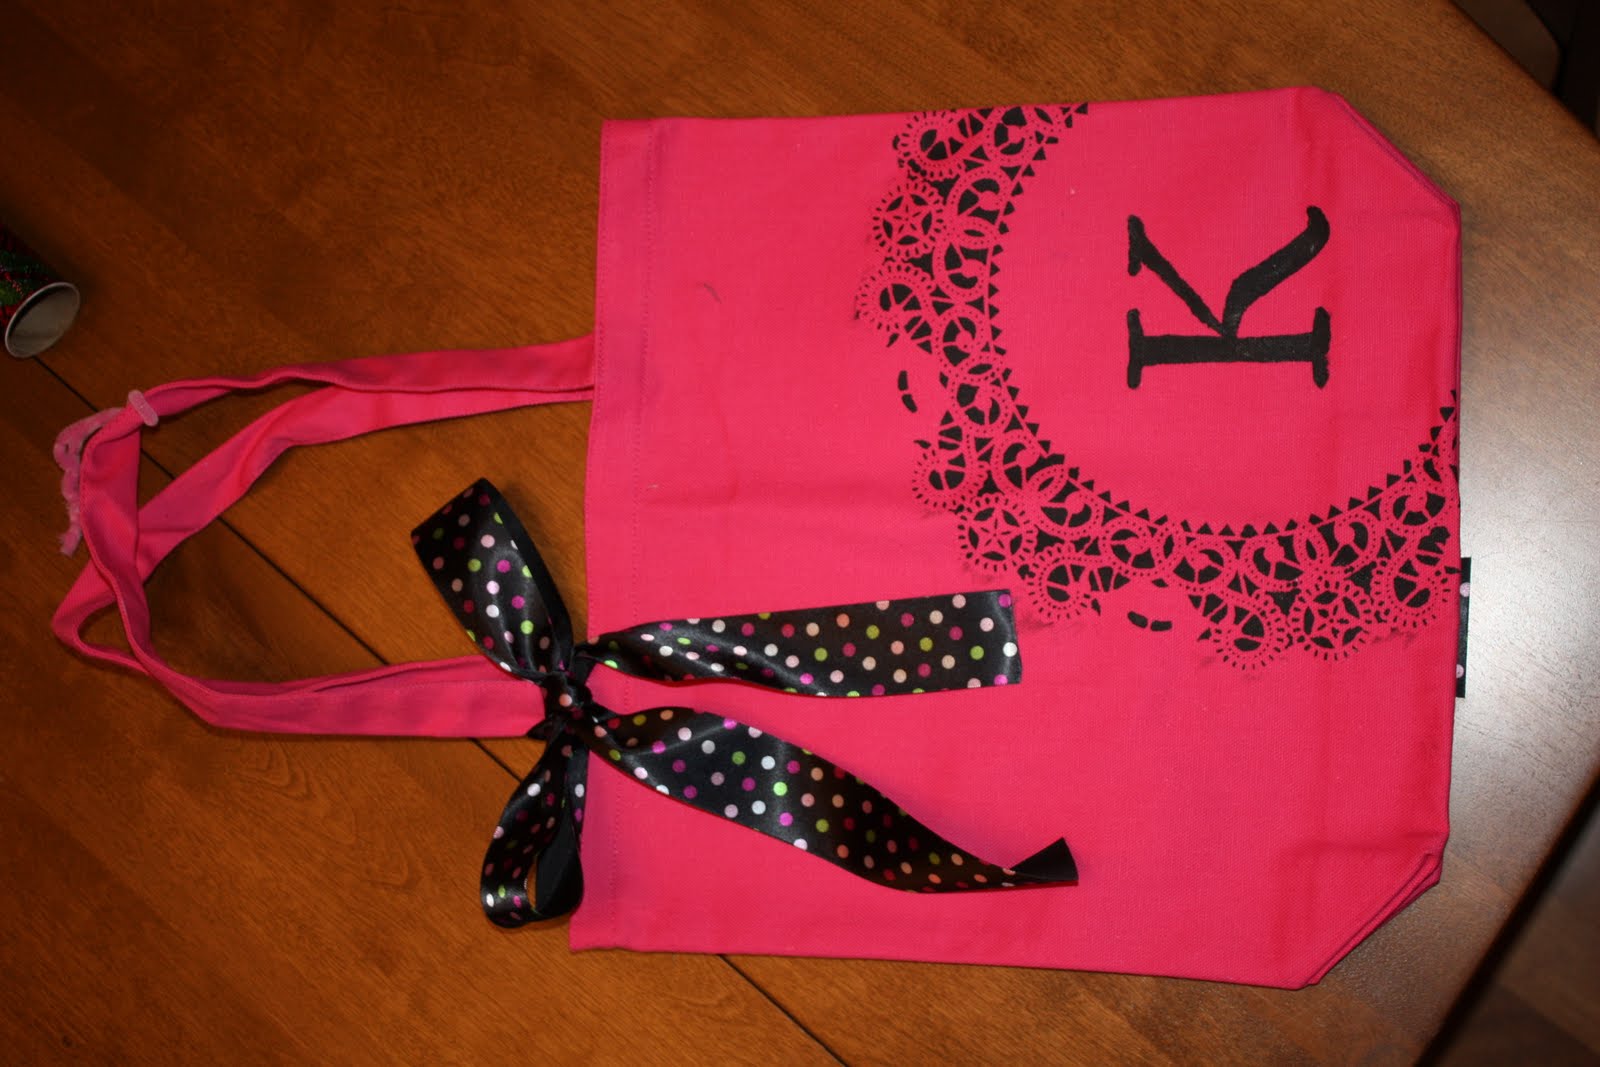
First, place a doily in the bottom right corner of the bag and paint in all of the holes that show on the bag. Oh, Pickles recommended lightly spraying an adhesive to hold the doily in place. If you choose to do this, use caution...too much adhesive and you will not be able to remove the doily at the end! I was too nervous, so I just chose to hold mine in place. It worked fairly well for me, though the edges were really hard and I did make a few minor mistakes.


Next, either use a stencil, freehand or make your own stencil to paint the initial on the bag. I opted to make my own stencils by typing my initials on Open Office then printing them on cardstock. Next, I cut out the black part of the letter to create a stencil. Another trick is to print it on regular paper, trace it onto wax or parchment paper, use an exacto knife to cut out the letter and then use the wax paper as a stencil.


Finally, dress up any other way you please. I found some ribbon on clearance that blended well and opted to tie a piece on one strap.
Twine would look really cute on some bags too - possibly with bells tied on at the ends? Lots of possibilities for fun!! Perhaps you could even cut out a non-fraying type of fabric in a quarter circle and fit it inside the doily on the bag for an added splash of color? The possibilities are endless!! Such a cute fun idea...here's hoping my nieces like it as much as I did!

Sunday, December 4, 2011

Christmas Countdown with Books

No pictures for this post and I know I mentioned this idea once before, but had to post about it again as we are loving it! We started a new Christmas Countdown tradition this year. I've probably accumulated about 10 or so children's Christmas themed books over the years. I checked out enough books from the library to have 25 books on hand. I "wrapped" each book in fabric (I couldn't bring myself to waste that much paper - we can reuse this fabric year after year). Each day, we unwrap a book and enjoy quality time reading. The girls and I really look forward to this time together. I tried hard to make sure at least a third of the books were renditions of the actual Christmas story, another third or so were closely tied to the story, the final section are a little more fun - Santa related, etc. (think Polar Express, Twas the Night Before Christmas). I don't have a book for Christmas Day yet, but I'm planning to stick a Bible in there and finish our countdown with the best book of all!

I'll try to come back and comment on some of our favorites. We are just a few days into it. We did read Snowmen at Christmas tonight and I always love that one - it barely ties in the Christmas story, but the illustrations are beautiful and it's such a cute idea.